You’ve collected your data, cleaned it up diligently, squeezed it into your carefully fine-tuned model and sweated many GPU hours and trained the model. The prediction is State-Of-The-Art! Bravo!
But what now?
Share it with the world of course! It has such great potential and no one has done this before, you want everyone to try it out! How? You ask.
In this tutorial, I’ll introduce you to an affordable and flexible way of deploying your trained Machine Learning model. I’ll walk you through every step in the way and hopefully, after reading this article, you’ll have no issue deploying your ‘next big thing(model)’ to the world.
How to Train(and export) Your Dragon(Model)
First of all, you need to train your model and export it. In this article, we’ll use Fast.ai’s library to showcase how it’s done. You may want to refer to my two-part articles about how to collect data and train a Chinese Calligraphy Classifier model or you can also use your own model. For the purpose of this article, I’ll assume that you already trained the model and achieved your desired accuracy rate.
Fast.ai uses a learn object to train the model, to export your model, use methodlearn.export() to export and save your trained model to a export.pkl file(my model export file from the link above is around 100MB). Save this file, we’ll use that later.
‘GitHub-Driven’ Web Development
With the model ready, the next step is web app development. I assume you are a full-stack web developer, so let’s jump right into coding. No, I’m just kidding here. We’ll use a boilerplate web app template on GitHub to quickly get your web app ready. You only need to do some minor tweaks and you’ll be ready to go. If you don’t know what GitHub is, it is a place to hold the source code of a lot of open-source applications. I already put a ready-made web app’s code there so you can easily download and reuse.
Go to this GitHub repository, click the big green button ‘Clone or download’ on the right side, like below:
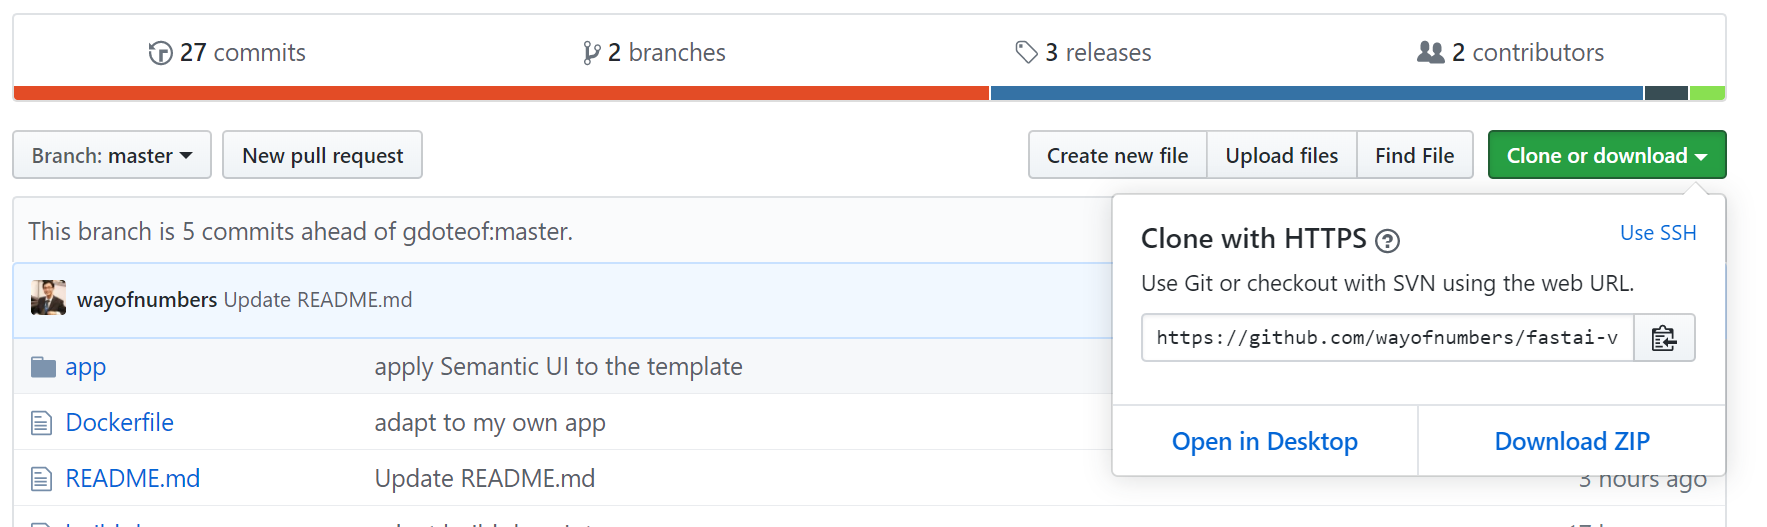
On the pop-down window, copy the link, then go to your terminal and type:
git clone [https://github.com/wayofnumbers/fastai-vision-uvicorn-gunicorn-starlette-docker.git](https://github.com/wayofnumbers/fastai-vision-uvicorn-gunicorn-starlette-docker.git)
cd fastai-vision-uvicorn-gunicorn-starlette-docker
These commands will clone all the required code onto your local machine, under a folder named fastai-vision-uvicorn-gunicorn-starlette-docker and enter that folder. This is the main folder we’ll be working on, there are a couple of things in it that worth explaining:
app: The structure of this appfolder is as below:
template
|--app.html
main.py
export.pkl
This is where your Starlette web app source code resides. It has a very simple Python file main.py. The **Starlette **is a lightweight ASGI framework/toolkit, which is ideal for building high-performance asyncio services.
It also has the saved model fileexport.pkl. The template folder holds an HTML template file app.html which will serve as your web app UI.
Remember the exported export.pkl file you saved? Pull that out and replace the one in this app folder. So the app will use your model. You are also welcomed to update the app.html file for better-looking UI, but it’s not necessary as far as deployment is concerned. Now the source code of your web app is ready, we need to wrap it into a Docker container and do some testing. We use the Dockerfile as the config file. We’ll explore more in the next section.
Let’s Dockerize it!
We will use Docker to create a container where our web app runs. If you don’t know what Docker is, just know that it is kind of a mini virtual machine, with all the necessary libraries and dependencies installed so the app can run smoothly. It is smaller and more flexible than real Virtual Machine and can be created and deployed very easily.
First, you need to install Docker. Here is a very thorough guide for your reference. After installation, if you are running Ubuntu, then it’s beneficial to run the following commands:
sudo groupadd docker
sudo usermod -aG docker $USER
This will eliminate the need to use sudoevery time you enter a docker command. Reboot, now docker should be properly installed.
In the same directory where app folder and Dockerfile resides, we need to create a docker image that contains all source code within this folder so we can test things out. Enter the following command(don’t forget the ‘.’ at the end):
docker build -t test_app .
This will start a docker image building process according to the Dockerfile. It will take a while, so let’s take a brief look at what’s inside the Dockerfile:
#1 FROM tiangolo/uvicorn-gunicorn-starlette:python3.7
#2 RUN pip install fastai aiohttp
#3 RUN pip install jinja2
#4 RUN pip install starlette
#5 COPY ./app /app
#6 WORKDIR /app
#7 EXPOSE 80
It is quite self-explanatory:
Line 1: Specify from which starter image we’ll build our docker image. We use tiangolo/uvicorn-gunicorn-starlette:python3.7 . You can find its GitHub link here and Docker Hub link here.
Line 2,3,4: Install fast.ai library, jinja template framework, Starlette framework, and other utilities.
**Line 5: **Copy your app folder into docker image so our app can run within the docker container.
Line 6, 7: Assign work directory to the app folder and expose port 80 to outside so we can visit the web app through port 80(HTTP).
Once the docker image is created, run docker images to check. You’ll find something like:
REPOSITORY    TAG    IMAGE ID    CREATED        SIZE
test_app      latest xxxxxxxxx   1 minutes ago  4.05GB
Now we can fire up a docker container from the created image and test your app locally:
docker run -p 80:80 \
		-v ./absolute/path/to/export.pkl:/app/export.pkl \
		-e TITLE="Chinese Calligraphy Classifier" \
		-e SUBTITLE="Can disambiguate Chinese calligraphy styles like KaiShu, LiShu, XiaoZhuan"
		test_app
On the above docker command, we specified the port to be 80. We transferred two environment variables into the container, TITLE and SUBTITLE, they will be used to display our web app UI titles. At the end we specified our docker image name: test_app. Please note that for export.pkl file, you need to use the absolute path, otherwise Docker will not be able to find it.
If you don’t see any error, your docker container should now be up and running. Head over to your browser and type 127.0.0.1 and hit enter, voilà! You should see the web app. Give it a ‘Kaishu’, ‘Lishu’ or ‘Xiaozhuan’ calligraphy image and hit ‘Classify’, you should see something like this:
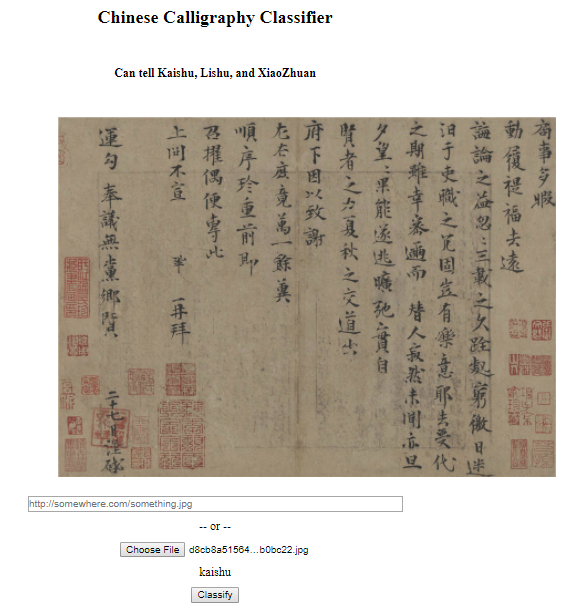
Very rough web app UI
You can see the app classified this as ‘KaiShu’, which is correct. Now that your app is up and running on the local machine, we are 80% done. What’s left is to deploy it on the cloud. Let’s head to the cloud next!
Next Step, Cloud!
For the cloud hosting service, we’ll use DigitalOcean. Comparing to the more incumbent players like Amazon AWS, GCP, or Azure, it’s more friendly to developers and cheaper. You can follow this well written and concise tutorial to create an account and a ‘Droplet’ of your own. (‘Droplet’ is a virtual machine running by Digital Ocean where you can install your app in, much like an AWS instance.) If you want, you can use this link to create your account and get $50 credit for free, which will be enough to get you started. Use the following configuration as a reference:
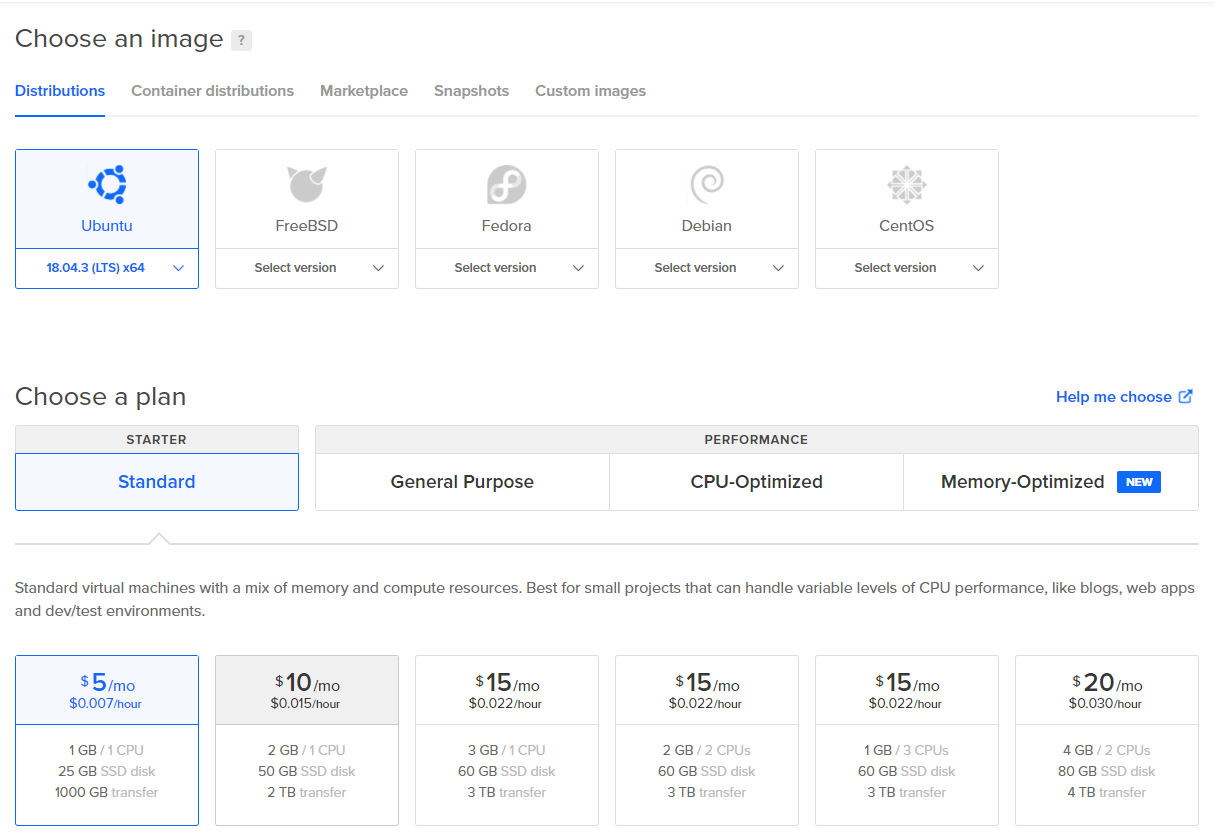
It is recommended that you create your Droplets with at least 4G memory since installing PyTorch will require a lot of memory. You can resize it down to 2G later.
You can choose the default ‘Data Center’ and set up your authentication method. Use SSH key or password, whichever way you feel more comfortable. I personally prefer SSH key, fewer keypresses and more secure. Once the Droplet is created, SSH into it and we are ready for the final deployment!
Deploy! Deploy! Deploy!
Now you should be able to SSH into your server as root. It’s recommended to create a normal user with sudo privilege, you can follow this tutorial. Once a normal user is created, log out of your root user and SSH back into the server with your normal user account. The final deployment is very similar to what we’ve already done on our local machine, only this time we do it on the remote droplet server. First, let’s git clone our repo so we have the source code:
git clone [https://github.com/wayofnumbers/fastai-vision-uvicorn-gunicorn-starlette-docker.git](https://github.com/wayofnumbers/fastai-vision-uvicorn-gunicorn-starlette-docker.git)
cd fastai-vision-uvicorn-gunicorn-starlette-docker
Don’t forget to copy your export.pkl file to replace what’s in the app folder. (follow this link if you don’t know how)
If docker is not installed, install docker. Then build the docker image using below command. Again, if the image building failed due to low memory, resize your memory up, you can resize it down later without much cost increase.
docker build -t test_app .
Once the image is built, fire up the docker container:
docker run -p 80:80 \
		-v ./absolute/path/to/export.pkl:/app/export.pkl \
		-e TITLE="Chinese Calligraphy Classifier" \
		-e SUBTITLE="Can disambiguate Chinese calligraphy styles like KaiShu, LiShu, XiaoZhuan"
		test_app
Once the docker container is up and running, head over to your browser and enter your Droplet’s IP address, hit Enter. Congratulations! You’ve successfully deployed your Deep Learning model to the Internet!
Conclusion
Not that hard, huh? Deployment using standard DigitalOcean Droplet offers a lot of flexibilities. You can do whatever you want to your Droplets since you have root access. You can run multiple apps on it, and pay very little($5 - $10 tier should be enough). If your app gets some traction and needs more resources, you can easily scale up.
I hope this tutorial somewhat help you deploy your AI app. If you have any question or want to share your deployment experience, please write a response below. Happy Deploying!